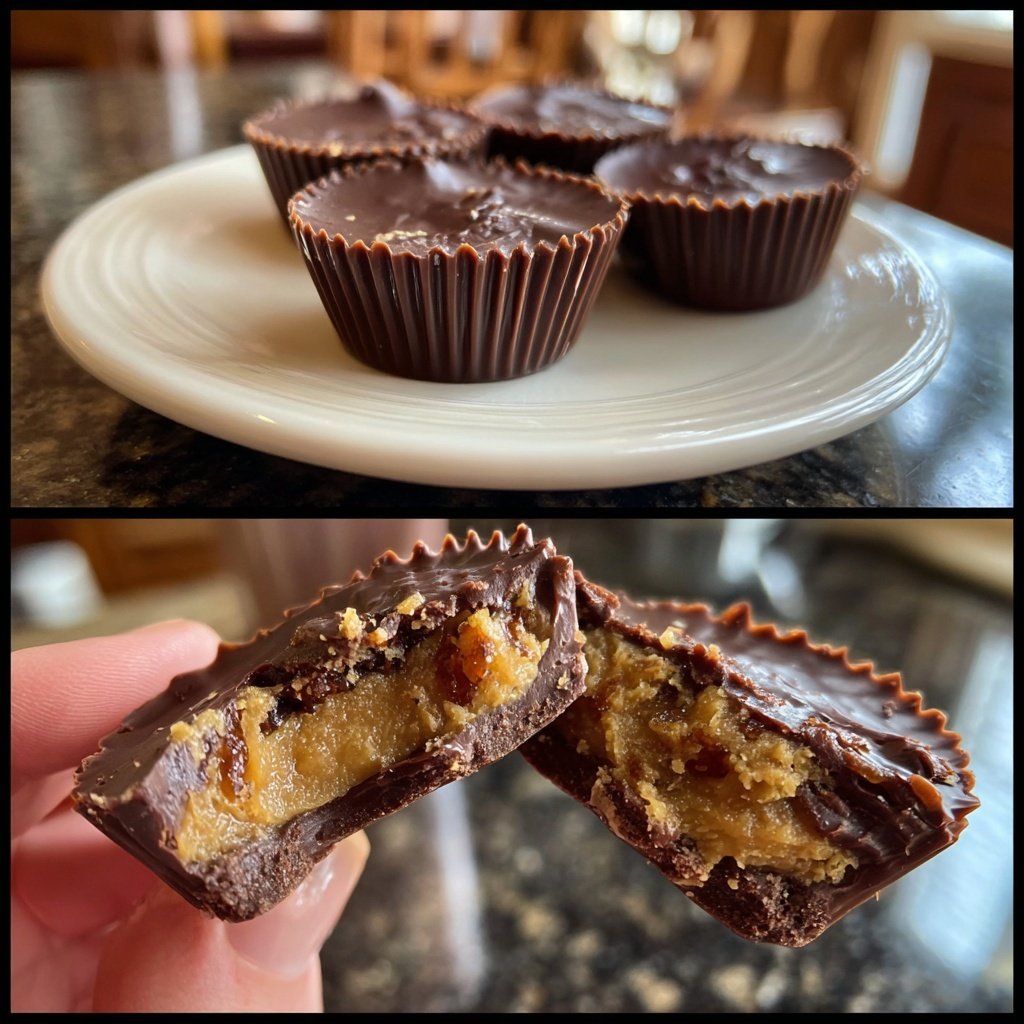
Homemade Peanut Butter Cups with Dates
Uitgelicht onder: Recepten voor gezellige familiegerechten
I’ve always loved the combination of chocolate and peanut butter, but adding dates brings a naturally sweet twist that elevates the flavor. Making these homemade peanut butter cups is not only simple but also incredibly rewarding. The rich chocolate coating contrasts perfectly with the creamy, date-infused peanut butter filling. After trying store-bought versions, I realized how much better they taste when made from scratch. With just a few wholesome ingredients, I can indulge in a sweet treat that I know is better for me, and it's a fun project to share with friends and family.
Each time I make these peanut butter cups, I'm reminded of the first batch I created in my kitchen. I had a craving for something sweet yet wholesome, so I decided to use dates for their natural sweetness. The first bite was a revelation; the dates added a depth of flavor I wasn't expecting, blending seamlessly with the peanut butter.
One of my favorite tips is to let the chocolate harden a bit before adding the peanut butter mixture. This way, the two layers fuse without mixing, creating a delightful texture. Whether for a quick snack or a dessert, these cups never fail to impress!
Why You'll Love These Peanut Butter Cups
- Naturally sweetened with dates for a healthier treat
- Creamy peanut butter filling that complements the chocolate
- Simple recipe that's fun to make and share
Key Techniques for Success
Melting the chocolate is a crucial step that can make or break the texture of your peanut butter cups. If using a double boiler, keep the heat low and stir frequently until the chocolate is completely smooth and glossy. If you opt for the microwave, heat in 30-second bursts, ensuring to stir each time. This method helps prevent overheating, which can cause the chocolate to seize and become grainy. Remember, patience is key here; chocolate should not be rushed.
When preparing the muffin tin, opt for high-quality silicone liners if available. They make removal much easier and can prevent the chocolate from sticking. Alternatively, paper liners work fine but might require a gentle tug to release the cups. You want to ensure that the chocolate base is covered sufficiently, but not too thick, as a thinner layer will help the filling shine through when bitten into, creating an appealing contrast.
Choosing and Using Ingredients
Using Medjool dates is essential, as they are softer and naturally sweeter than most other varieties. When you mash them, they should form a smooth paste; if they feel too dry, a quick soak in warm water for about 10 minutes can moisten them up. This helps in blending the filling better, leading to a creamier consistency that complements the peanut butter and chocolate. If you're unable to find Medjool dates, consider using other soft dates, but adjust the quantity based on their sweetness levels.
For the chocolate, dark chocolate chips with at least 70% cocoa content offer a rich flavor that balances perfectly with the sweetness of the peanut butter and dates. If you're looking for a dairy-free option, be sure to choose high-quality vegan chocolate. The salt adds depth to the flavors, so don’t skip it! A sprinkle of flaky sea salt on top of the finished cups can enhance the taste further, giving a delightful contrast to the sweetness.
Ingrediënten
Ingredients
For the Peanut Butter Cups
- 1 cup dark chocolate chips
- 1/2 cup natural peanut butter
- 1/2 cup Medjool dates, pitted and mashed
- 1/4 teaspoon sea salt
- 1 teaspoon vanilla extract
Ensure to keep the ingredients measured and ready before starting.
Bereidingswijze
Instructions
Melt the Chocolate
In a double boiler or microwave, melt the dark chocolate chips until smooth. If using a microwave, heat in 30-second intervals, stirring in between to avoid burning.
Prepare the Muffin Tin
Line a muffin tin with cupcake liners for easy removal. Pour a small amount of melted chocolate into each liner, just enough to cover the base.
Make the Filling
In a bowl, mix together the mashed dates, peanut butter, sea salt, and vanilla extract until well combined and smooth.
Assemble the Cups
Once the chocolate has set a little, place a spoonful of the peanut butter mixture in each liner. Cover the filling with the remaining melted chocolate, ensuring it's fully enclosed.
Chill and Serve
Refrigerate the cups for about 15 minutes or until the chocolate has completely hardened. Enjoy your delicious homemade peanut butter cups!
These cups can be stored in an airtight container in the refrigerator for up to a week.

Professionele Tips
- Experiment with different nut butters or add a sprinkle of sea salt on top before chilling for an elevated flavor.
Storage and Make-Ahead Tips
These homemade peanut butter cups can be made ahead of time! After setting, store them in an airtight container in the refrigerator for up to two weeks. This makes them a great snack option to prepare for the week ahead. Just be sure to keep them chilled until serving, as they can soften if left at room temperature for too long.
For longer storage, consider freezing the cups. They freeze beautifully and can be kept for up to three months. Place separated layers of parchment paper between the cups in a freezer-safe container to prevent sticking. When you’re ready to enjoy, just let them sit at room temperature for about 20-30 minutes before serving to regain their creamy texture.
Serving Suggestions and Variations
While the classic peanut butter and chocolate combination is a favorite, don’t hesitate to get creative with your fillings! Adding a pinch of cinnamon or a scoop of protein powder to the peanut butter mixture can enhance the flavor and nutritional profile. If you're a fan of crunch, consider incorporating chopped nuts or seeds into the filling for added texture and flavor, bringing a delightful contrast to the creamy structure.
For an impressive presentation, consider drizzling melted chocolate over the tops of the cups or dusting them with cocoa powder or crushed nuts before serving. These small touches elevate the visual appeal and can make them perfect for gatherings or as a thoughtful homemade gift. Remember, the beauty of this recipe lies in its versatility, so don’t be afraid to experiment with different flavors!
Vragen Over Recepten
→ Can I use a different type of chocolate?
Yes, you can use milk chocolate or even white chocolate, depending on your preference.
→ Are there any substitutes for dates?
You can use dried figs or raisins, but the flavor and sweetness may vary.
→ How do I store the peanut butter cups?
Store them in an airtight container in the refrigerator for up to one week.
→ Can I freeze these cups?
Absolutely! They can be frozen for longer storage, just be sure to use an airtight container.
Homemade Peanut Butter Cups with Dates
Gemaakt door: Harriet Bloom
Recepttype: Recepten voor gezellige familiegerechten
Vaardigheidsniveau: Easy
Eindportie: 12 cups
Wat je Nodig Hebt
For the Peanut Butter Cups
- 1 cup dark chocolate chips
- 1/2 cup natural peanut butter
- 1/2 cup Medjool dates, pitted and mashed
- 1/4 teaspoon sea salt
- 1 teaspoon vanilla extract
Stappen
In a double boiler or microwave, melt the dark chocolate chips until smooth. If using a microwave, heat in 30-second intervals, stirring in between to avoid burning.
Line a muffin tin with cupcake liners for easy removal. Pour a small amount of melted chocolate into each liner, just enough to cover the base.
In a bowl, mix together the mashed dates, peanut butter, sea salt, and vanilla extract until well combined and smooth.
Once the chocolate has set a little, place a spoonful of the peanut butter mixture in each liner. Cover the filling with the remaining melted chocolate, ensuring it's fully enclosed.
Refrigerate the cups for about 15 minutes or until the chocolate has completely hardened. Enjoy your delicious homemade peanut butter cups!
Extra Tips
- Experiment with different nut butters or add a sprinkle of sea salt on top before chilling for an elevated flavor.
Voedingswaarde (Per Portie)
- Calories: 150 kcal
- Total Fat: 10g
- Saturated Fat: 3g
- Cholesterol: 0mg
- Sodium: 50mg
- Total Carbohydrates: 14g
- Dietary Fiber: 2g
- Sugars: 8g
- Protein: 3g